Create Template
Create whatever type of report you need. All with fully customizable templates and your own branding. The only limit is your imagination.
Last updated
Create whatever type of report you need. All with fully customizable templates and your own branding. The only limit is your imagination.
Last updated
You're in the Helpcenter for Version 2 of our app! We introduced major upgrades, enhanced features and a new user interface. 🎉
Need info on Version 1? Access the
Not sure which version you have?
All reports are based on a .docx file that runs in the background. So you either download the .docx template after creating a report in the app to use it as a base or you create a .docx file from scratch.
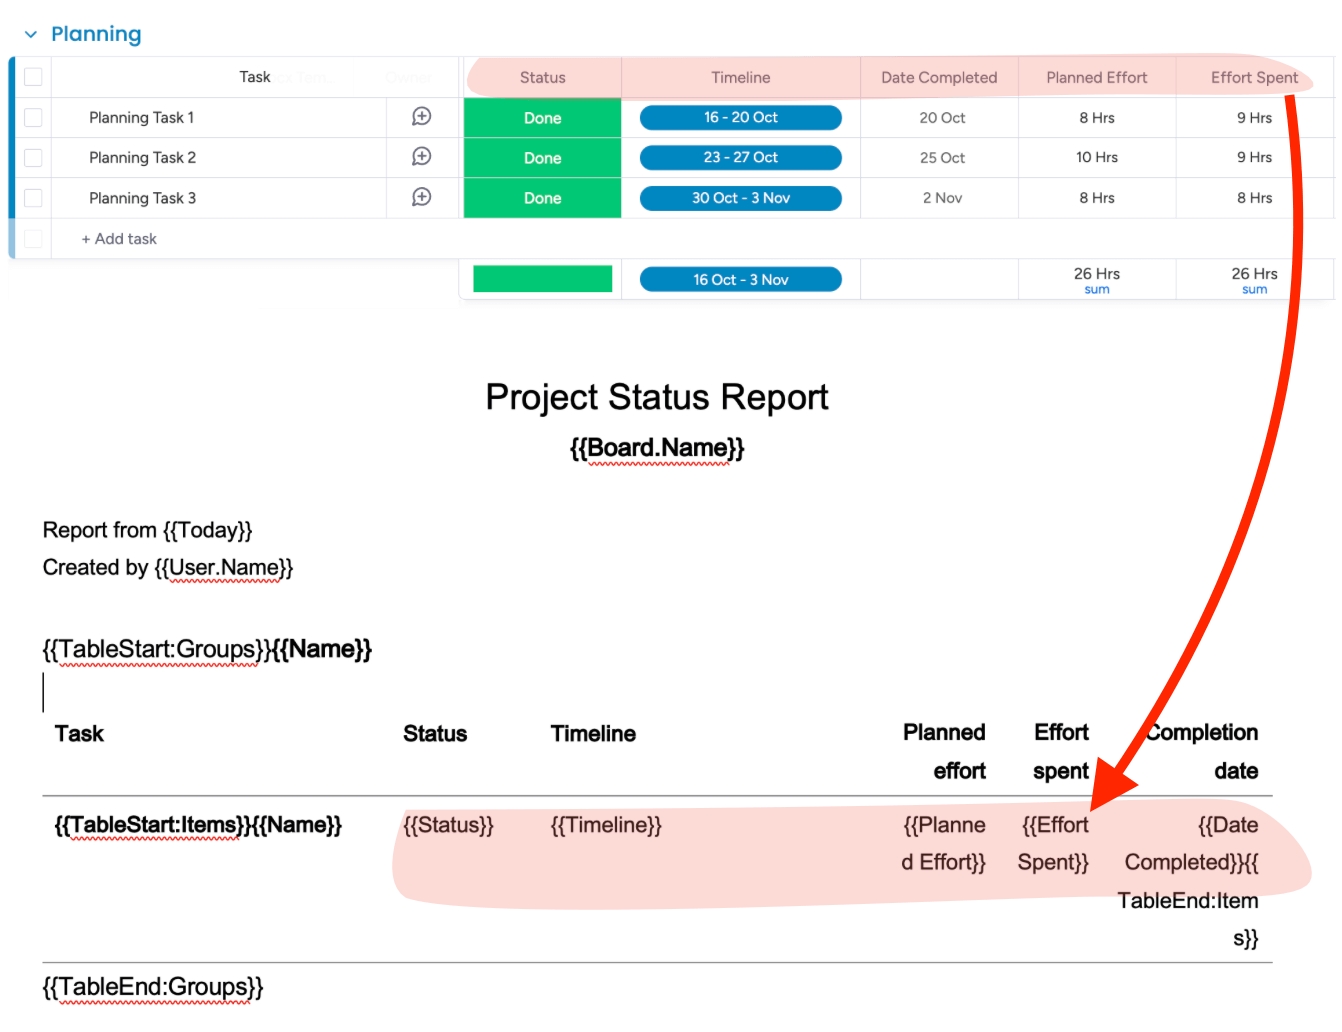
In that .docx file you find or put placeholders in the relevant places where you want to insert data from your boards.
For example: if you want to insert the data from a status column somewhere in the document, use the placeholder {{Status}}. The placeholder is the column title within two curly braces: {{ColumnTitle}}.
If you have a column called "Due Date", the placeholder would be {{Due Date}}
If you need further assistance, please .
The easiest way to customize your template is to download a .docx template where you have already created the basics using the Report Builder or Board Report. This allows you to build directly on your e.g. table and only change colors or add text, placeholders, etc. This way you can let the app do the main job and just finetune it manually.
Open the PDF Report Generator view in your board.
Click in the top right corner of the real-time PDF report preview.
Choose the option "Customize template" and "download template".
Open the downloaded document and edit it in Microsoft Word, then upload the customized template again.
If you feel confident, you can also start from scratch. All Templates must be in Microsoft Word format (.docx).
When you open your template, you will find placeholders. Placeholders indicate where to insert information from your board into your report. For example, if you want to insert today's date somewhere in the report, use the placeholder {{Today}}.
In the default template, you will find a list of all available placeholders from your specific board.
You can donwload the default template by clicking on "Upload new template" in the "Select template" dropdown menu.
Decide what information you want to add to your document.
Search for the right placeholder in your list.
For example {{User.Name}} to output the name of the monday.com user that created the document or {{Name}} for the item name.
Insert the placeholder anywhere in your document.
If you are not working with the default template, you can easily put the placeholders together yourself.
All placeholders must be placed between those brackets: {{Name of the placeholder}}
These creates Microsoft Word Merge fields. When a report is created from the template, merge fields are used to transfer information from monday.com directly into the document.
The name of the placeholder for your items is the same as in your board´s columns.
There are several merge fields that are actually tabular merge fields, e.g. lists or tables containing multiple values. This is the case when creating a document for an entire board, that contains all items.
When creating a document for the entire board, you need to add merge tables.
A merge table outputs a loop across the entire board and can thus retrieve all items and output them on the document.
So, if you want to retrieve all items from a board, you need to add {{TableStart:Items}} and {{TableEnd:Items}} to your document.
All placeholders, that you want to use, have to be put between those two variables:
{{TableStart:Items}}{{Name}} {{Status}} {{Owner}}{{TableEnd:Items}}
In addition to the data you want to display, you can also customize the design of the template. To make these adjustments, you can simply use all functions that Microsoft Word offers.
Here are some examples:
Insert your logo
Add your company details to the footer
Change font, font size, spacing, etc.
Insert images
Add/change text
Besides that you can also build up on our default templates or an existing template from our and use it as a starting point for your customizations.
This also works for SubItems:
NOTE: To make it easier for you, we recommend creating the basis of your table using the , the , or the feature and then simply adjusting it as needed. This will save you a lot of work.


