Actions
What should happen with the report after creating it? Besides simply downloading your PDF, you can also send it via email or save it to a file column.
Last updated
What should happen with the report after creating it? Besides simply downloading your PDF, you can also send it via email or save it to a file column.
Last updated
You're in the Helpcenter for Version 2 of our app! We introduced major upgrades, enhanced features and a new user interface. 🎉
Need info on Version 1? Access the
Not sure which version you have?
Define what should happen with the report? By default, all reports are automatically saved in the list of reports under "More".
Send the PDF to the user who generated the report via email.
Send the report to email address(es) found in a "People" or "Email" column in your board.
Send the report to others via email by adding one or more email addresses, separated by semicolon. (e.g. hello@company.com; tom@company.com)
If you are creating a report for a single item, you can also file the document to a specific column in your table. To do this, select an existing column (type “Files”) in your table or create a new column (type “Files”) in advance.
File name: Enter a file name. If no name is entered, the name of the report/template is used. You can also use placeholders in the file name, e.g. Project report {{Today}}. This way the date will always be added to your file name.
File format: Define whether you want to download/send/save the report as PDF or .docx file.
Once you have defined your actions, you have two options: execute them immediately or create an automation for them.
If you choose this option and, for example, have defined that your report should be sent via email to the user who created it, the report will now be sent once.
If you want to use your report along with the defined actions more frequently, you can create an automation. This allows you to generate, for example, a weekly report and automatically send it to the specified email addresses. It is helpful to give your template a unique name, as this will also be the name of your automation recipe.
In the next step, you will need to set up an automation.
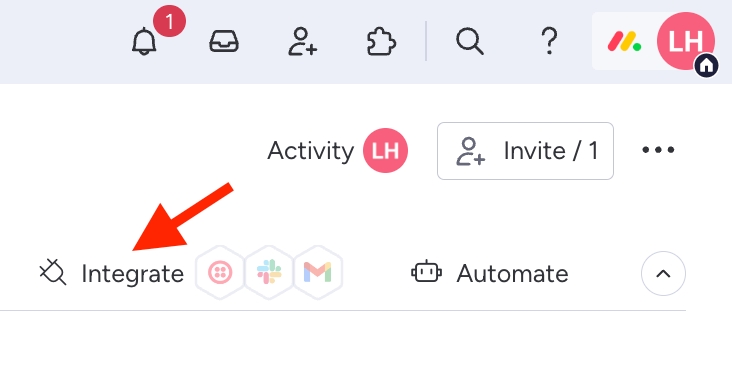
Click on Integrate.
Search for "PDF Report Generator" and select it.
Select one of the integration recipes, that suits your case. Learn more about automations here.
Fill in the parameters.
Add the integration to your board. If you now change the status, click on a specific button or a certain date is reached, a document will automatically be created.